Reading and Writing Arduino Mega Tx Rx

 Hey Fellas! Hope you are doing well. Today, I am going to unlock the details on the Introduction to Arduino Mega 2560. Information technology is a microcontroller lath based on Atmega 2560 microcontroller. Arduino Boards accept revitalized the automation industry with their easy-to-employ platform where everyone with picayune or no technical background can get started with learning some basic skills to program and run the board.
I accept updated manufactures previously on Arduino Uno, Arduino Nano, and Arduino Pro Mini. All these boards office similarly in 1 fashion or the other. In that location are some basic features like PCB layout design, size, number of analog pins and breadboard friendly nature that brand them unlike from each other. In terms of coding, all these boards are programmed in Arduino IDE software and you don't demand to attach extra components or devices to put them in running condition. Everything is already built in the board that makes this device readily bachelor. Simply plug and play with the lath equally per your requirement. Hither'south the video presentation of Arduino Mega 2560:
All the boards mentioned above piece of work perfectly for a number of Arduino Projects when you require a uncomplicated job to be completed with fewer I/O pins and retention. However, when the project goes complex, a lath with less memory fails to consummate the task. This is where Arduino Mega 2560 comes in handy. This board comes with 54 pins and 16 analog pins with more retentiveness to store the code. Sounds crazy, isn't information technology? Thank you to technology that keep your covered in every aspect and provides support in any way when information technology comes to fulfilling your technical needs.
I'll try to comprehend each and everything related to Arduino Mega 2560, what is this most, the primary features, working, technical specifications and everything you lot need to know. Let's jump right in.
| No. | Pin Number | Pin Description |
|---|---|---|
| 1 | D0 – D53 | 54 Digital Input / Output Pins. |
| 2 | A0 – A15 | 16 Analog Input / Output Pins. |
| 3 | D2 – D13 | 12 Pulse Width Modulation ( PWM ) Pins. |
| 4 | Pin # 0 (RX) , Pin # ane (TX) Pin # 19 (RX1) , Pin # 18 (TX1) Pin # 17 (RX2) , Pin # 16 (TX2) Pin # 15 (RX3) , Pin # 14 (TX3) | iv Serial Communication Ports (8 Pins). |
| five | Pin # 50 ( MISO ) Pin # 51 ( MOSI ) Pin # 52 ( SCK ) Pivot # 53 ( SS ) | SPI Communication Pins. |
| half-dozen | Pin # xx ( SDA ), Pin # 21 ( SCL ) | I2C Communication Pins. |
| vii | Pin # 13 | Built-In LED for Testing. |
- If you are planning to acquire Arduino Nano Programming, then you must have a await at Introduction to Arduino IDE.
Other Arduino Boards:
Y'all should too have a look at these other Arduino board, you might observe them interesting as well. Compare their features and find the most suitable one for your projection. Here's the list of other Arduino boards:
- Arduino UNO
- Arduino Pro Mini
- Arduino Nano
- Arduino Due
- Arduino Micro
- Arduino Lilypad
- Arduino YUN
Introduction to Arduino Mega 2560
- Arduino Mega 2560 is a Microcontroller lath based on Atmega2560. It comes with more memory space and I/O pins as compared to other boards available in the market.
- There are 54 digital I/O pins and 16 analog pins incorporated on the lath that brand this device unique and stand up out from others.
- Out of 54 digital I/O, 15 are used for PWM (pulse width modulation).
- A crystal oscillator of 16MHz frequency is added on the board.
- This board comes with USB cablevision port that is used to connect and transfer code from estimator to the board.
- DC power jack is coupled with the lath that is used to power the board. Some version of the Arduino board lacks this characteristic similar Arduino Pro Mini doesn't come with DC ability jack.
- ICSP header is a remarkable addition to Arduino Mega which is used for programming the Arduino and uploading the code from the computer.
- You can download the Arduino Mega 2560 datasheet bu clicking beneath button:

Download Arduino Mega 2560 Datasheet

- This board comes with two voltage regulator i.eastward. 5V and 3.3V which provides the flexibility to regulate the voltage as per requirements as compared to Arduino Pro Mini which comes with only ane voltage regulator.
- There is no much deviation between Arduino Uno and Arduino Mega except after comes with more memory space, bigger size and more than I/O pins.
- Arduino software chosen Arduino IDE is used to plan the board which is a mutual software used for all boards belonged to Arduino family.
- Availability of Atmega16 on the board makes information technology different than Arduino Pro Mini which uses USB to serial converter to program the board.
- There is a reset push and 4 hardware serial port called USART which produces a maximum speed for setting upwards advice.
- The following figure shows the specifications of Arduino mega 2560.

- Arduino Mega is particularly designed for the projects requiring complex circuitry and more than memory infinite. About of the electronic projects tin can exist done pretty well past other boards available in the market which make Arduino Mega uncommon for regular projects. Yet, at that place are some projects that are solely washed by Arduino Mega like making of 3D printers or controlling more than i motors, considering of its power to store more instructions in the code retentivity and a number of I/O digital and analog pins.
- There are three ways to power the board. Yous can either use a USB cable to power the board and transfer code to the lath or you tin can power it upwards using Vin of the board or through Ability jack or batter.
- Last two sources to power the lath are required once y'all already built and compile code into the board through USB cable.
- This board comes with resettable polyfuse that prevents the USB port of your computer from overheating in the presence of high current flowing through the board. Nigh of the computers come with an power to protect themselves from such devices, notwithstanding, the addition of fuse provides an extra layer of protection.
- It tin be used either mode i.east. for creating stand up-alone projects or in combination with other Arduino boards. About complex projects can be created using this board.
Allow's take a expect at Arduino Mega 2560 Pinout:
Arduino Mega 2560 Pinout
- Following figure shows the pinout of Arduino Mega 2560:
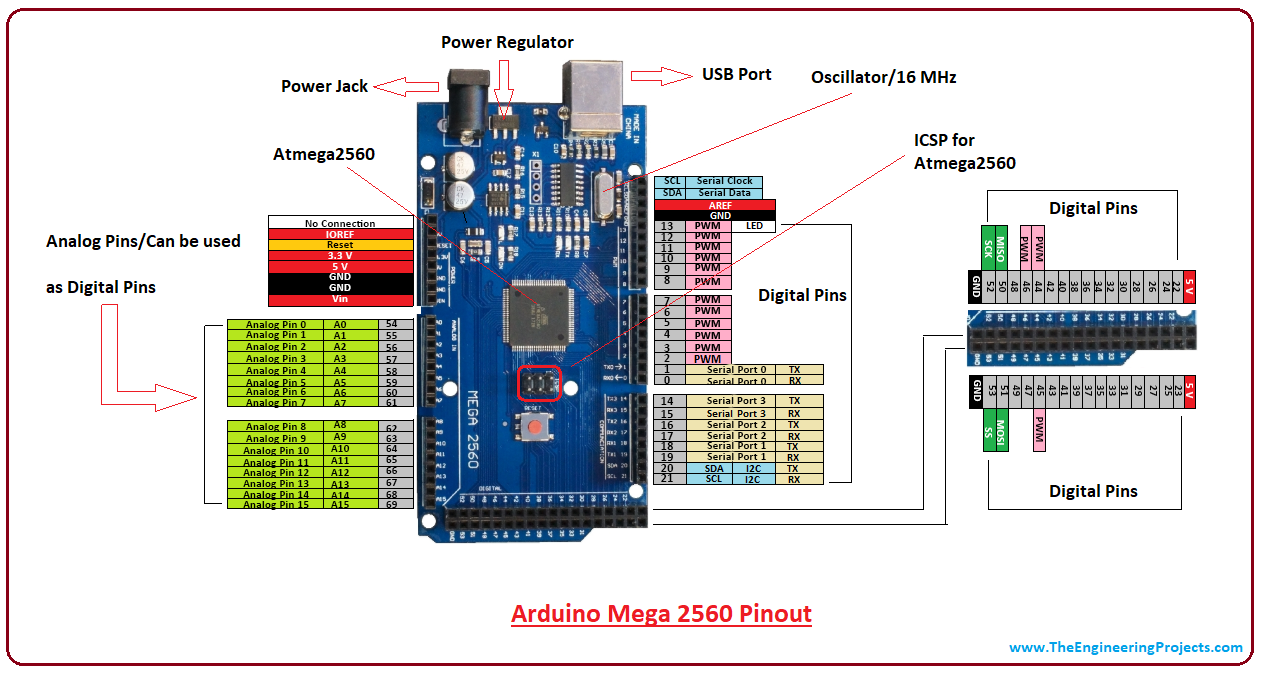
- Each pin comes with a specific role associated with information technology. All analog pins can be used as digital I/O pins.
- Designing of a project using Arduino Mega gives y'all the flexibility of working with more memory space and processing ability that allows you to work with a number of sensors at in one case. This lath is physically larger than other Arduino boards.
Arduino Mega 2560 Pivot Clarification
- 5V & 3.3V. This pin is used to provide output regulated voltage around 5V. This regulated power supply powers up the controller and other components on the lath. It tin can exist obtained from Vin of the board or USB cable or another regulated 5V voltage supply. While another voltage regulation is provided by 3.3V pin. Maximum power it can draw is 50mA.
- GND. There are five ground pins available on the board which makes it useful when more than one footing pins are required for the projection.
- Reset. This pin is used to reset the board. Setting this pivot to Low will reset the board.
- Vin. It is the input voltage supplied to the board which ranges from 7V to 20V. The voltage provided past the ability jack can exist accessed through this pin. However, the output voltage through this pin to the board will be automatically gear up upwards to 5V.
- Serial Communication. RXD and TXD are the serial pins used to transmit and receive serial information i.e. Rx represents the transmission of data while Tx used to receive data. There are 4 combinations of these series pins are used where Serail 0 contains RX(0) and TX(i), Serial 1 contains TX(xviii) and RX(19), Serial ii contains TX(xvi) and RX(17), and Serial 3 contains TX(14) and RX(15).
- External Interrupts. Half-dozen pins are used for creating external interrupts i.e interrupt 0(0), interrupt 1(3), interrupt 2(21), interrupt 3(20), interrupt 4(xix), interrupt 5(eighteen). These pins produce interrupts by a number of means i.e. providing Depression value, ascent or falling edge or irresolute value to the interrupt pins.
- LED. This board comes with built-in LED connected to digital pin xiii. HIGH value at this pin will plough the LED on and LOW value will turn it off. This gives y'all the modify of nursing your programming skills in real time.
- AREF. AREF stands for Analog Reference Voltage which is a reference voltage for analog inputs.
- Analog Pins. There are 16 analog pins incorporated on the lath labeled as A0 to A15. It is important to note that all these analog pins tin exist used as digital I/O pins. Each analog pin comes with ten-bit resolution. These pins can measure from ground to 5V. Withal, the upper value can exist inverse using AREF and analogReference() function.
- I2C. 2 pins 20 and 21 back up I2C communication where 20 represents SDA (Serial Data Line mainly used for holding the data) and 21 represents SCL(Series Clock Line mainly used for providing information synchronization between the devices)
- SPI Communication. SPI stands for Serial Peripheral Interface used for the transmission of information between the controller and other peripherals components. Four pins i.e. 50 (MISO), 51 (MOSI), 52 (SCK), 53 (SS) are used for SPI communication.
Arduino Mega 2560 Dimensions
Follwoing figure shows the dimensions of the Arduino Mega 2560:
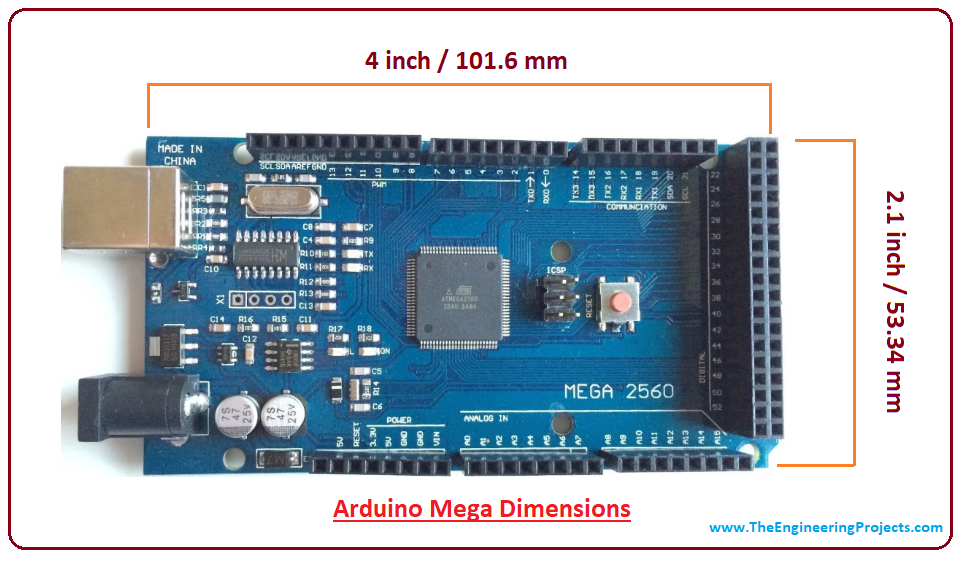
- Arduino Mega is comparatively larger than other boards available in the market. Information technology comes four-inch length and 2.ane-inch width. However, USB port and power jack are slightly extended from the given dimensions.
Shield Compatibility with Arduino Mega 2560
- Arduino Mega is compatible with most of the shields designed for other Arduino boards.
- Before y'all intend to utilize a shield, brand sure the operating voltage of the shield is compatible with the board voltage. Most of the shields operate at iii.3V or 5V which is compatible with this board, withal, shields with higher operating voltage tin damage the board.

- Also, the header distribution of the shield must resonate with the pin distribution of the board, then yous can only attach the shield with the board and brand it in a running condition.
Arduino Mega 2560 Programming
- Arduino Mega 2560 tin be programmed using Arduino Software chosen IDE which supports C programming.
- The code you lot make on the software is called sketch which is burned in the software and and then transferred to the board through USB cable.
- This board comes with a built-in bootloader which rules out the usage of an external burner for burning the lawmaking into the board.
- The bootloader communicates using STK500 protocol.
- Once y'all compile and burn the programme on the board, you lot can unplug the USB cable which somewhen removes the ability from the board. When y'all intend to incorporate the board into your projection, you can power it upwardly using power jack or Vin of the board.
- Multitasking is another characteristic where Arduino mega comes handy. However, Arduino IDE Software doesn't support multitasking feature but you lot tin utilise other operating systems like FreeRTOS and RTX to write C program for this purpose. This gives you the flexibility of using your own custom build programme using ISP connector.
Arduino Mega 2560 Applications
Arduino Mega 2560 is an ideal pick for the projects requiring more memory space to used with more number of number pins on the board. Post-obit are the main applications of the Arduino mega boards.
- Developing 3D printer
- Controlling and handling more than 1 motors
- Interfacing of number of sensors
- Sensing and detecting temperature
- Water level detection projects
- Home automation and security systems
- Embedded Systems
- IoT applications
- Parallel programming and Multitasking
That's all for today. I promise you take found this article useful. However, if yous are unsure or have any question you can ask me in the comment section below. I'd honey to help you lot according to best of my expertise. Experience free to keep u.s. updated with your feedback and suggestions, they help the states provide y'all quality piece of work that resonates with your field of work and helps you go along coming dorsum for what nosotros have to offer. Thanks for reading the article.
johnsontheyeaterve.blogspot.com
Source: https://www.theengineeringprojects.com/2018/06/introduction-to-arduino-mega-2560.html
0 Response to "Reading and Writing Arduino Mega Tx Rx"
Post a Comment